
Fulfillment Prebilling Order Entry
This option allows you to order customer owned items and invoice the customer when the merchandise is received into the warehouse. When inventory items are entered on a Prebill, the item type will automatically change to DS for item masters that are coded as FG or OP. Once the prebill is entered, transfer drop ship purchase orders must be run to create the inventory purchase order. After you transfer, print the Prebill order. The inventory purchase order may be edited to add instructions to the vendor. Print inventory purchase orders from the inventory menu.
Procedure
All order types associated with the Fulfillment option are found under Transactions and Order Entry.
Select Add
Operator initials
Defaults to the initials used to log into ProfitMaker and may be changed.
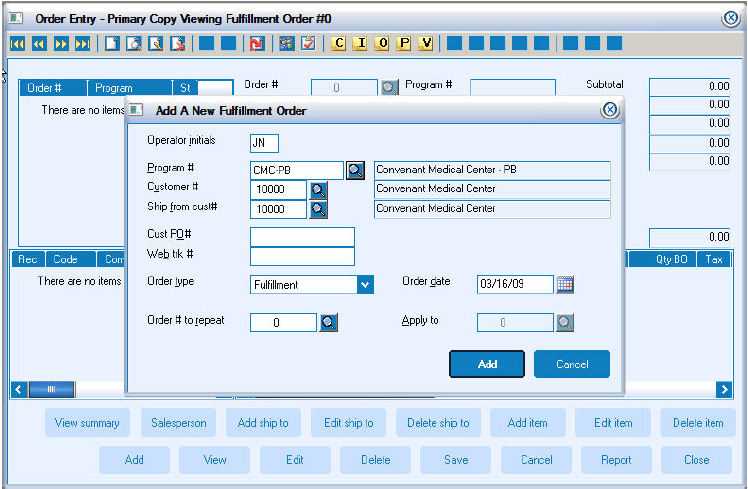
Program #
Enter or select from a lookup the program for which the Prebill is being entered.
Customer #
If the program master has a customer number, it will default in automatically. If there is no default, enter or select from a lookup the customer for which the prebill is being entered.
Salesperson #
If the program or the customer master contains a primary sales person number, it will default automatically. The sales person name will be displayed.
- Tip: The program master can be created with a salesperson number and commission percentage to override the customer master settings.
Comm %
Commission percentage to be used as the default on this order. Will default from the program master or the customer master.
Cust PO #
Enter the customer purchase order number.
- Tip: In many cases the person placing the order does not have a PO. In these situations it is suggested to enter the person’s last name. This becomes a very useful lookup for locating the order for future customer service functions.
Order type
Select the type of order as Prebill-1 item.
Order date
Defaults to your current machine date and can be changed.
Order # to repeat
Orders previously entered for this customer may be repeated. This will include the ability to repeat all or selected ship to’s and line items.
Click Add.
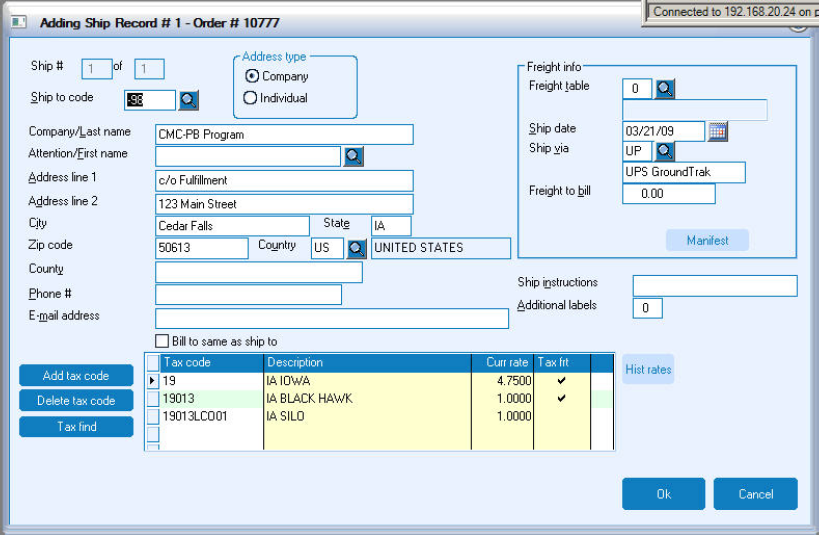
Ship to Information
Ship #
Updated by the system and indicates if more than one ship to has been entered.
- Tip: The order may contain up to 99 ship to’s as long as the number of unique item numbers used on all of the ship to line item records is less than 100 total items.
Ship to code
Will default to –98 for a Prebill order and does not need to be changed.
Address type
The address stored in the program master for return address will update the shipping address fields for prebilling orders.
Company/Last Name
Updated from the program master return address.
Attention/First Name
Updated from the program master return address.
Address Line 1
Updated from the program master return address.
Address Line 2
Updated from the program master return address.
City
Updated from the program master return address.
State
Updated from the program master return address.
Zip
Updated from the program master return address.
Country
Updated from the program master return address.
Phone #
Phone or fax number for reference.
E-Mail Address
Only one E-mail address per order can be stored.
Freight table
A freight table will default from the program master if one has been entered. If there is no default, enter or select a table from the lookup. Leave this field blank to allow actual freight charges to be added during billing.
Ship date
Defaults in based on the selection in “Additional Inventory Information” section in “Company Information”. Can be modified.
Ship via
Used to indicate the shipping method for the prebilling inventory purchase order. Defaults from the program master and can be changed for this order.
Freight to bill
The freight charge for the order when freight table is not used.
#Pkgs
Used for reference only.
Weight
Will be updated based on the weight entered on the item master or can be entered manually. Is displayed during editing or viewing functions.
Zone
Used for reference only.
Tax code #
A tax code is required and will default from the customer master.
Tax code #2
Will default from the customer master.
Ship instructions
Will print on the packing list. Used for Fulfillment order entry.
Additional labels
Use for requesting mailing/shipping labels for fulfillment order entry.
Ship to totals
During edit or viewing a summary of the ship to, totals will display.
Line Item Window
L#
Indicates what line the item is on.
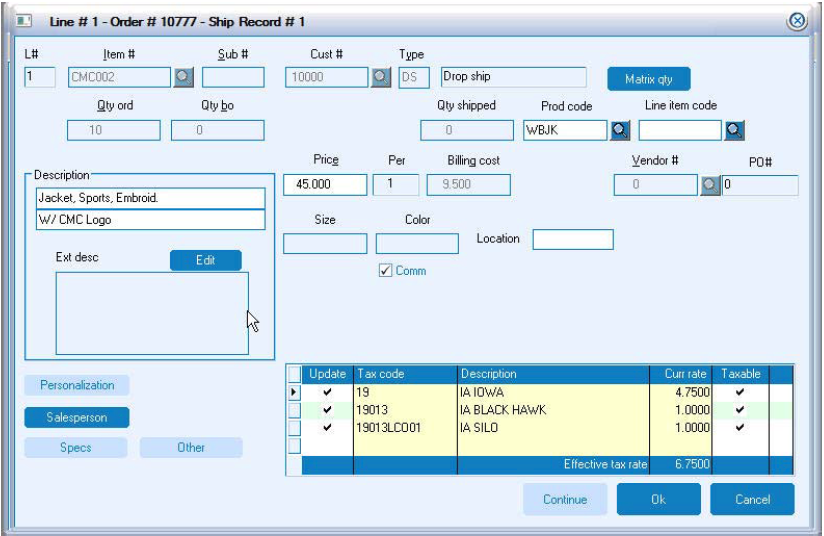
Item #
Enter the item that is being ordered for restocking in the warehouse.
Sub #
Part of the item number, indicates size and color.
Matrix
The item must be a wearable item and “Company Information” must indicate that matrix order entry is enabled. Will display a window allowing multiple sizes and colors to be entered from which the line items will be processed.
Type
All items, no matter what the item master type is, will change to DS during item entry.
Qty order
How many of the item is being ordered.
Qty Shipped
Is updated during the Bill/Ship process.
Description
Item description. This description defaults in from the item master or customer price record.
Ext desc
If the item master contains extended description for sales orders or all orders it will default. Otherwise, the description may be entered manually.
- Tip: Extended description will print on the manifest copy of the order and may print on the invoice per “Company Information” setup.
Personalization
Only enabled if the item master indicates this item can be personalized. Depending on the item setup, personalization will print either a production order or will print on the drop ship purchase order.
Price
The price of the item. Will default in from the item master or customer price record.
Per
Is displayed based on the item master.
Billing Cost
The standard cost of the item. This will default in from the item master. For prebilling orders the cost will be updated based on vouched cost during bill/ship fulfillment orders.
Vendor #
Available only if the item type is FG. This vendor number will become the default when this record is transferred to the purchase order.
PO#
The purchase order number created by the transfer drop ship purchase order option.
Comm
Will default from the initial add window and will only be overwritten if the item master contains a different commission percent.
Tax table
Will show applicable tax.
Select Ok to continue with processing of the order. This will return you back to the main fulfillment order entry window. Select Ok to display the order summary window and complete the order.
Edit Summary
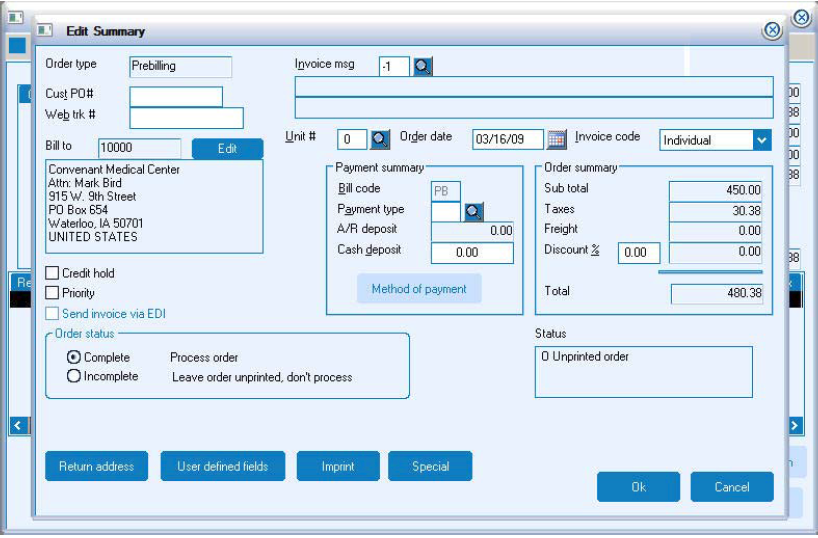
Order type
Will default in from the initial add window.
Sl#
Salesperson account number. Can be changed if needed.
Comm %
Defaults from the initial add window, but may be changed. A message will display before proceeding to update the line item commissions.
Cust PO#
Defaults from the initial add window, but may be changed.
Invoice code
Invoice type code. This code defines the invoice to be Individual or Consolidated. This will default from the program master but can be changed.
Invoice msg
Defaults from the program master or an invoice message can be entered that has been set up in master codes. If a zero is entered for the message number a one-time message may be typed in. The message will print on the invoice.
Bill to address
This address defaults in from the customer master. Select edit to change the bill to address.
Unit
Enter the unit that this order should post to.
Bill code
Prebilling orders will default to PB.
Payment type
If the order was paid by cash or credit card and you want to enter the information on the order, enter CC.
A/R deposit
This field will be updated with deposits entered during “Cash Receipts”.
Cash deposit
Only enter an amount if the payment IS NOT a credit card.
Method of Payment
If you have entered a “CC” in the payment type field, this window will appear when you click “Ok”.
Credit Hold
If checked, the order will not be processed further. Depending on “Company Information” settings, orders may be placed on hold because of overdue invoices or if the customer has exceeded their credit limit.
Priority
Check this box if you would like to print this order first.
Send invoice EDI
Determined by your “Company Information” and customer master selections.
Return address
The return address defaults in from the program master. This will be the address that any items are returned to if there are any problems.
User defined fields
Available if “Company Information” has enabled this feature.
- Tip: Labels describing these fields can be set up for each individual program. The “Generic Report Generator” will use these fields for sorting, selecting and printing.
Imprint Instructions
Vendor instructions that will print on the drop ship inventory purchase order.
Special Instructions
Will print on the drop ship purchase order.
Order Summary
Calculates the subtotal, taxes, freight, and discount for this order.
Subtotal
The subtotal of the order.
Taxes
The tax amount that is owed on this order.
Freight
Any freight that is entered on the order.
Discount %
Percent that will be used to discount each line on the order. Defaults from the customer master and may be changed.
Total
The total amount of the order including the discount and tax.
Status
The status of the order. Ex. - O=Unprinted order, PO=Printed order, IO=Invoiced order, XO=Interrupted printed order.
Method of payment
The two-digit code that defines the various methods of payment that were set up previously.
The rest of the information will default in depending on how the payment method was set up.
Now that the order is entered, the next step is to print the order. Since every item is a drop ship item, follow the steps of Transfer Drop Ship Purchase Orders in the Procedures section of Reference Manual.
As the merchandise arrives in the warehouse, receive against the purchase order. Select Inventory, Transactions, Receive Merchandise. Below is the receiving screen. Select the line item to receive. Receive complete or enter the quantity received. Click Finish. This will update the inventory quantities on the item master. See the receive merchandise section of this manual.

When all the merchandise has been received, click Finish and a “Receive Merchandise Final Report” will print. It lists the PO#, receiving date, vendor #, item #, sub#, description, quantity received, conversion factor, stock received ,unit cost, per , total cost, and has created a Lot # which is the year, month, day, time and operator’s initial.
When the vendors invoice comes in follow the steps for vouching an inventory purchase order. Refer to the Vouching an Inventory Purchase Order in this manual.
Prebill Order Billing
In Fulfillment/Transactions, Bill/Ship Customer Orders
ASICS recommends that the vouching and receiving of merchandise be done prior to billing the customer. This will ensure that the quantities and cost have been verified and updated to the prebill order.
Update unprocessed manifest orders – is available with the “Manifest Interface Special”. This option will allow processing of new orders that have shipped and corresponding manifest details will be updated to the ProfitMaker software. Orders previously shipped through this process won’t update again. When using this option all other selections will be disabled.
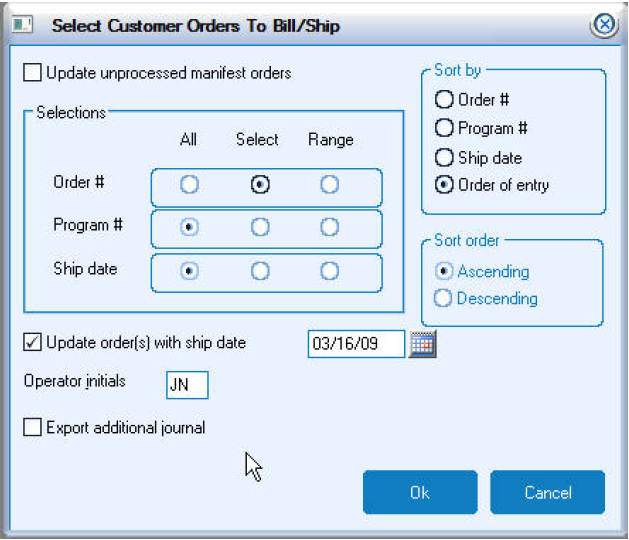
Selections
Select the orders to be billed by choosing All, Selected or a Range of Order #, Program # and Ship date.
Sort by
When the orders come up on the screen to be billed they can be listed by Order #, Program # or Ship date.
Sort order
Refers to the sort by. Sort by Ascending or Descending Order #, Program # or Ship date.
Update order(s) with ship date
The date entered here will default into the orders as a ship date. If the check mark is removed, each order will contain the ship date entered at the time of order entry. Each orders ship date can be changed when billing the order.
Operator initials
The initials of the operator billing the orders.
After the selections are completed on this screen click OK.
The initial display window will appear similar to the fulfillment order entry main display window. The top left section will list all the orders selected to bill/ship. To the left of the order number, icons are used to bring attention to the order. A yellow attention required icon will be used with one of the other icons on the order itself. Attention required includes: unvouched drop-ship items, missing credit card information or back ordered items. Click the icon beside the order number to change the icon to red with an X. This order will not be updated or billed.

The top right section will list the general information about the order. The order number, program number, order date, order status and the total of the order.
The bottom right section will list the lines items. Scroll right to see all the details of each item or double click the line. Quantity shipped will default based on the ordered quantity, unless there is a back order.
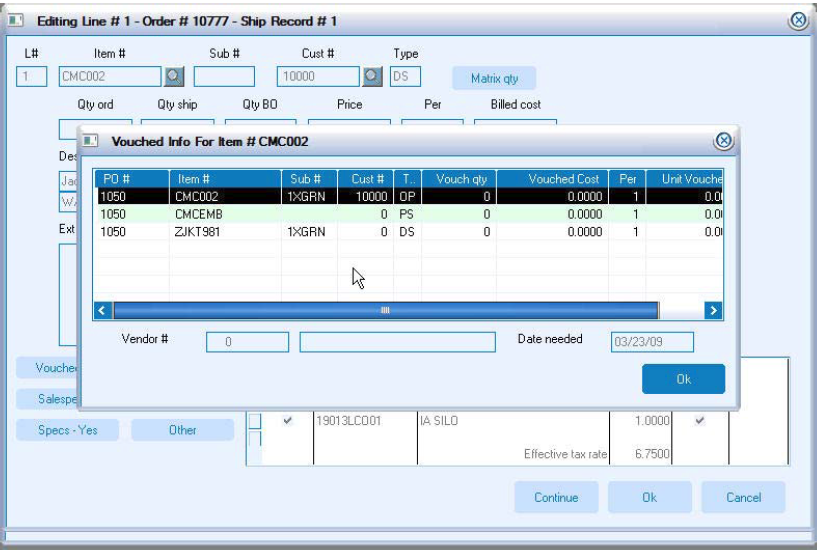
Click the vouched info button to view the activity of this item.
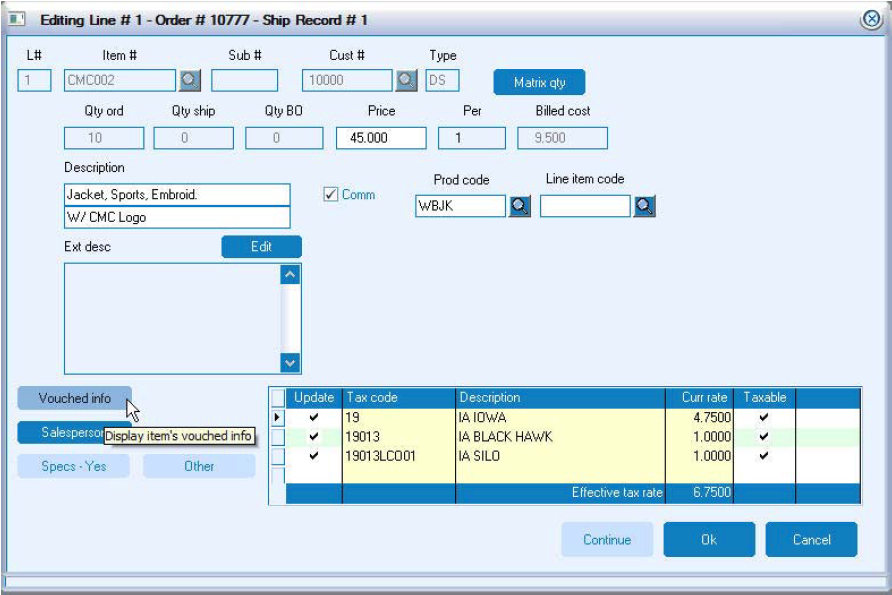
By activating the Vouched info button, the vouched activity for this item will appear. It will display the purchase order #, item #, sub#, item type, vouched quantity, vouched cost, per unit vouched cost and if vouched partial or complete. This information is used to update the line item billed cost amount.
The lower left section is the ship to record summary.
By selecting “Edit shipto” or double clicking on the ship to record you may access the window and make any required changes.

Ship to
Shows which ship to record is displayed and the total number of records.
Address type
Indicates company or individual.
Ship to Code
The code/address the order was shipped to
Tax code #1
Defaults in from the customer master but can be changed here.
Tax code #2
Defaults in from the customer master but can be changed here.
Freight table
Indicates if a freight table is calculating the freight
Ship date
Date merchandise was shipped
Ship via
Method of shipment, and may be changed
Freight to bill
Amount of freight to charge if a freight table isn’t used
# Pkgs
Quantity of packages sent.
Weight
Weight of the packages
Zone
Zone merchandise was shipped to.
Ship to totals
Displays the subtotal of merchandise, tax freight and the grand total Once all changes have been completed select “Ok” to update the order record.
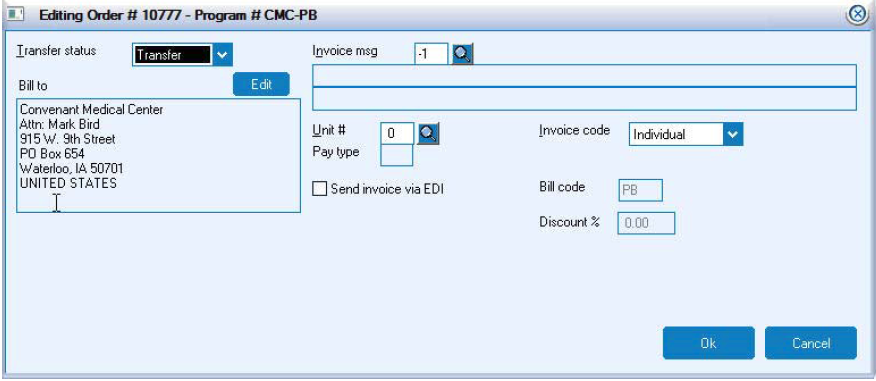
The edit order button contains the bill to address, invoice code, payment type, etc.
Sl#
The salesperson on this order
Comm %
The commission percentage for the salesperson
Bill to
The address where the invoice will be sent
Invoice Code
Indicates the type of invoice, individual or consolidated
Invoice instruction code
A personalized message that prints on the bottom of the invoice.
Unit #
Which unit the order will post to.
Pay type
CC in the field indicates the order was paid by cash or a credit card.
Send invoice via EDI
Will be checked if the invoice will be sent EDI.
Bill Code
Indicates if an invoice will print. PB = Prebill and the invoice will print. CS = Cash sale and an invoice will not print. SB = Ship and bill and an invoice will print.
Discount %
Percent that each line of the order will be discounted.
Only the fields that are enabled may be changed during billing. Once all changes are complete, select “Ok” to update the order record.
The Manifest button is only active if the “Shipping Manifest Interface Special” has found package detail records related to this order and shipping record. This button will display on the ship to edit window and may be accessed from the main display window. Information will include the number of packages that were processed for shipment and their respective detail records.
The Actions button is used to Add, Edit or Delete the line items.
The Preview button will display a Preview Report that can be printed to verify the accuracy of the input.
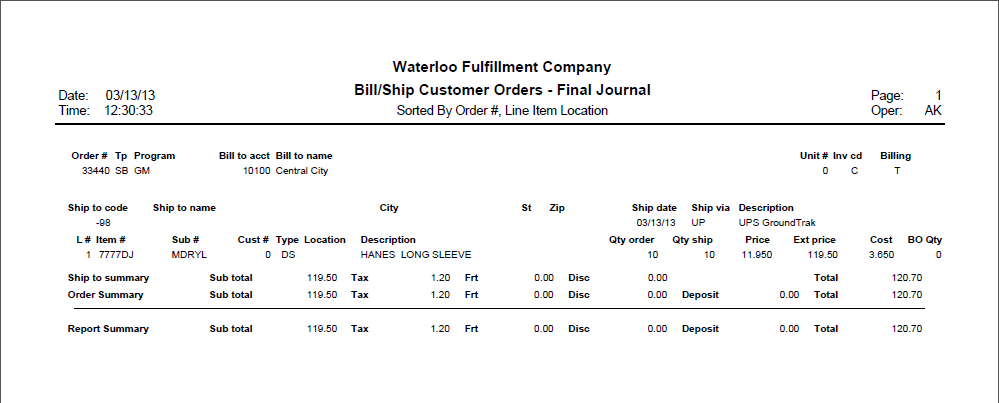
When all orders have been completed click the Finish button. A journal will print for you to verify that the billing is correct. Orders can still be edited by going back into Bill/Ship.
This is the last chance to verify your billing is correct. It can still be edited at this stage. TS = transfer status and it needs to be T so that it will transfer to billing. If there is an H or *, the order will not transfer. The H means the order is on hold. The * indicates that the order was paid by cash or credit card and the Post Cash/Credit Card Deposits has not been completed.
The Abort button will cancel the process – updating of records will not occur.
Transfer to Billing
This option will allow review and selection of orders to be transferred and the invoice printed.
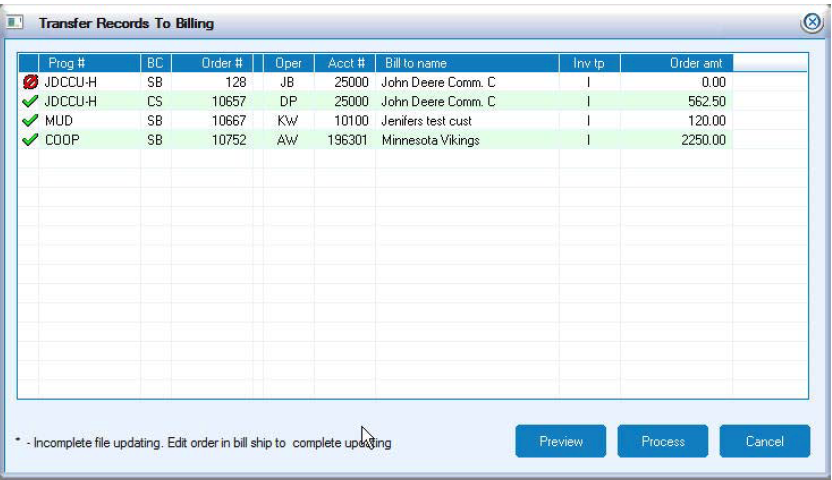
- Note: Once the order has been transferred the order can no longer be modified.
At this time the invoice may be printed.