
Item Master Maintenance
![]() ProfitMakerPLUS
ProfitMakerPLUS
![]() Fulfillment
Fulfillment
An item master is required for fulfillment order entry processing. Any item, including miscellaneous charges, dropship items, stock or multiple vendor-processed items, may be created and maintained in this function. Detailed analysis of sales, movement, cost, vendors and customer pricing records can be viewed. As we explore each window and each field you will see how flexible it is to create and maintain a wide range of products and situations common for the distributor.
Overview of an Item Master
The initial window for adding will allow input of key information regarding this item. These fields will be displayed and may be modified after the add function is completed. Additional information regarding these fields will follow.
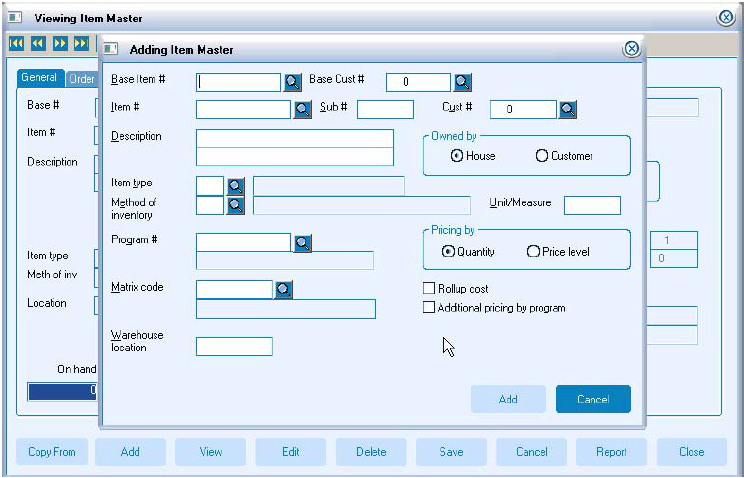
General Tab
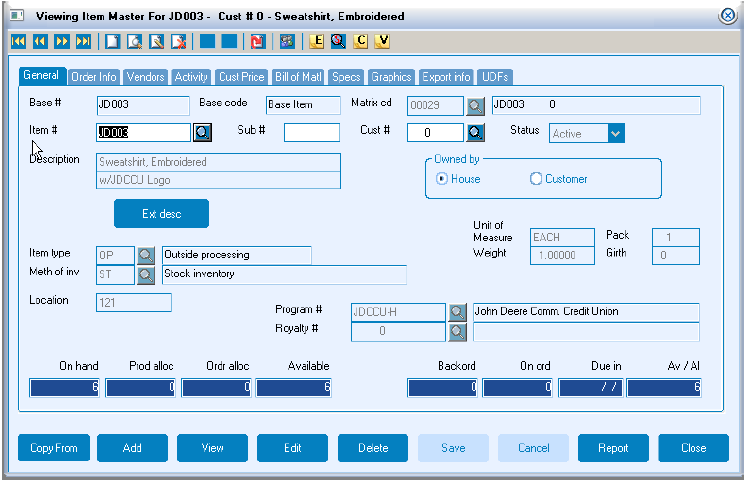
Base item #
This field is used when adding new groups of items that have the same item number, price, cost, and vendor information. An example would be wearable items. The base item field is left blank on most hard goods.
- Tip: This base item master, once setup, is then used to create other items that differ only in color and size.
Base Code "field"
Is updated automatically with the following codes:.
B = base item (used as a template to create additional items)
S = item with a sub number (small, medium, large)
R = regular item with no base item.
Base customer #
The item customer number field is used to help identify item masters. The base customer number is simply the customer number portion of the item being created. This customer number is used to indicate who owns or will be purchasing, exclusively, the inventory. Usually, customer owned item masters would include an item customer number.
Note: The combination of item # and cust # is used in identifying an item master.
Matrix code
When the base item is to be used to create additional items, such as wearable’s, where they all use the same item number with a “sub number” indicating the size and color you will be stocking, then a matrix id code will need to be setup and entered here. Matrix id codes are set up using Matrix Id Maintenance. The matrix code is used in several ways throughout the system:
- In Item Maintenance, Activity tab, buttons, to display Sales and available on hand Quantities, are available if the item contains a matrix id code in the General tab. This gives an overall picture of the group of sub items.
- Customer orders, fulfillment orders and stock purchase orders allow item entry using a matrix window if a base item master indicates a matrix item.
- Information printed on stock inventory purchase orders, invoices and packing lists and manifests may also print in matrix format.
Item #
This is the SKU number assigned to the item. The number will default to upper case. If a base item was created, the item number default will be the base number.
- Tip: Start the number based on the program master. In the example above, the number starts with “JD” which identifies the program that it belongs to. This format makes it very easy for lookups and reporting selections.
Sub #
The sub number will identify the item by size and color.
- Tip: The sub # field contains two characters for size and three characters for color.
Item customer #
The item customer number is used to help identify item masters. This customer number is also used to indicate who owns or will be purchase exclusively the inventory. Usually, customer owned item masters would include an item customer number. The item customer number may be used to sort inventory reports.
Note: The combination of item #, sub # and cust # is used in identifying an item master.
Description
There are two lines of description available.
- Tip: ASICS recommends that the most pertinent information be entered on the first line. Many of the inventory reports, packing lists and lookups will only print/display the first line.
Extended description
This button allows you to create additional descriptions that will print on the purchase order, the customers invoice or both. A general note option is available to enter notes for internal use only.
Item type
This will define, within the system, how inventory is to be updated. The following item type codes are available:
DS
Drop ship item. This item type code should be used for items that will always be drop shipped from your vendor to your customer or to an additional vendor. This item will not track on hand quantity or item movement.
FG
Finished good item. This item type code should be used for items purchased from one outside vendor and requires no additional processing. This item will be purchased as stock inventory and will track on hand quantity and movement.
LB
Labor item. Similar to the use of an MC item. This item type is not used very often, but is still available if needed.
MC
Miscellaneous charge. This item type code is used for items that are additional charges needed on an order. Examples are: “setup charges”, “warehouse fees”, or “handling” charges. No inventory or vendor information will be stored for these items. MC items can only be setup as house owned.
OP
Outside processed item. This item type code is used when you require a product to be created by combining two or more items or vendors before you receive the item. An example is imprinted/embroidered goods.
PS
Purchase service item. This item type code is used for the decoration step of imprinted or embroidered wearable items. This item requires a vendor to be setup.
Method of inventory
The method of inventory selection is determined based on the item type. These are your possible selection options:
DS
(Drop ship) Valid for “DS” and “OP” house owned item types. This method of inventory does not update or display on hand quantity, allocations, availability or inventory history. Fulfillment order entry will allow the creation of a drop ship purchase order, paperwork for the vendor, to ship the goods directly to the customer, for items that have a “DS” method of inventory.
ST
(Stock) Valid for “FG and “OP” items. This method of inventory is used for items always shipped from your warehouse. The item will be update with/ and display on hand, allocations, availability and inventory history.
VA
(Variable) Valid for “FG and “OP” items. This method of inventory is used for items that allows the operator to determine, at time of fulfillment order entry, to either ship the items from inventory or to create a drop ship purchase order for this item to have the vendor ship directly to the customer.
- Tip: If the quantity ordered is greater than quantity available, you have the option to drop ship the item during fulfillment order entry if the item type is VA
NA
(Non-inventory) Valid for “MC”, “PS” and “LB” items. The updating of the item will be the same as it is for “DS” methods of inventory.
Location
![]() Bin location identifier.
Bin location identifier.
The location entered here will print on the packing list and physical inventory count report, and can be used as a sort option for inventory reports.
![]() The location will default in from company information and can be changed for each item. The location will print on packing lists and the physical inventory count report, and can be used as a sort option for inventory reports.
The location will default in from company information and can be changed for each item. The location will print on packing lists and the physical inventory count report, and can be used as a sort option for inventory reports.
Status
The item can be flagged as active or inactive. Inactive items will only allow the item to be placed on orders until the availability of the item reaches 0. Inactive items can be suppressed on several inventory reports. Inventory item lookup will display an “*” next to items that are marked inactive.
Owned by
Indicates who owns this inventory item. If owned exclusively by the distributor, then it should be coded as “House owned”. If owned by the customer, then select “Customer owned”. During fulfillment order entry the price and cost is suppressed if both the item master and program master are coded as Customer owned. During fulfillment prebilling order entry, the price and cost will appear as normal.
Unit of measure
Reference information only.
Weight
If a weight is entered in this field the system will calculate the estimated weight during fulfillment order entry by multiplying the quantity ordered by the number entered in this field.
Pack
![]() This field is for reference only. This data should indicate the item quantity per carton/box.
This field is for reference only. This data should indicate the item quantity per carton/box.
![]() The quantity entered will be the default for the location item detail used during receiving and shipping. This data should indicate the item quantity per carton/box.
The quantity entered will be the default for the location item detail used during receiving and shipping. This data should indicate the item quantity per carton/box.
Girth
This field is for reference only.
Program #
A program number is used for grouping items together for reporting purposes. . It does not block the item from being sold under other programs.
Royalty #
This is for reference only. Used to reference the royalty payment vendor.
Order Info Tab
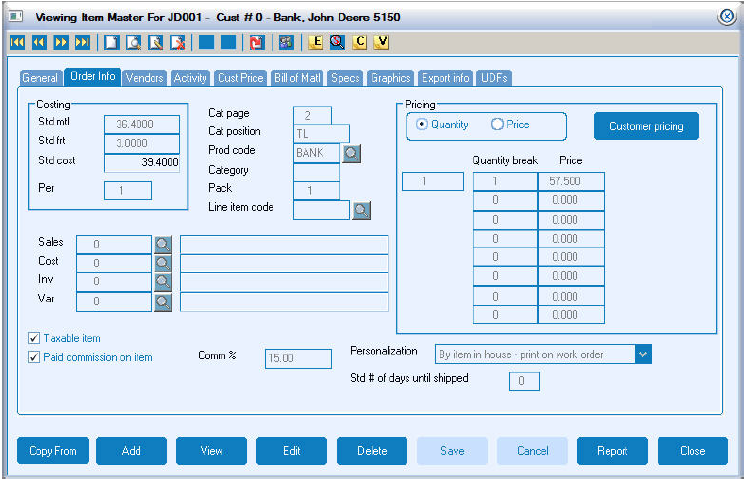
Std mtl
This field is the expected purchase cost of the item from the vendor plus overhead. The amount needs to be based upon the per of this item.
Std frt
This field is the expected cost of freight per piece from the vendor to your warehouse. The amount needs to be based upon the per of this item.
- Tip: Fulfillment does have the feature of updating standard material and standard freight cost with actual (FIFO/LIFO) costs. Please review “Update Standard with Actual” for additional options.
Std cost
Calculated total from Std mtl plus Std frt fields. Standard cost is used during order entry as the billed cost amount that commission will be calculated from.
- Tip: Standard cost is used to update and create commission records. It is very important to make sure that you accurately estimate your Std mtl and Std frt costs. If the cost field is left 0 on an item then cost can be entered during order entry.
Per
Enter the correct per based on the price and cost information. For example if the price and cost are based on a per of 100; enter 100.
Cat page
used to reference the catalog page number on which this item appears.
Cat position
Used to reference the location of the item on the catalog page.
Product code
This field requires the creation of a product code master. This master can be created prior or during the creation of the item master. Product codes generally define a broad spectrum of items. Example: Jackets, Desk items, etc. The product code is used to track sales and cost of invoiced items for the month and year.
- Tip: This field is used in many inventory reports as a sort and selection option.
Category
This field is user defined.
- Tip: This field is used in many inventory reports as a sort and selection option.
Line item code
Line item codes may be assigned to items in order to track profitability by a grouping of your choice. Generally they are a more detailed definition. Example: Jackets for summer, winter, ladies, men’s, etc. Line item codes must be setup in Line Item Code Maintenance prior to being used in order entry.
G/L accts
General ledger accounts can be entered on an item master to re-direct general ledger postings. Any accounts entered on the item master will become the primary posting accounts regardless of the program or company information general ledger setup.
Taxable item
If the item is to be tax exempt regardless of customer or ship to tax defaults, you may uncheck the item and tax will never be calculated on this item only. Example: wearable’s are not taxed in MN when shipped in MN.
Paid commission on item
Uncheck this box when this item is not commissionable.
Comm %
If the item is commissionable and you wish to override the standard commission % rate entered on the program master, you may enter an amount here.
Price type
Indicates that the pricing structure is based on Quantity break pricing or Per pricing. Per pricing will prompt the operator to select a price from a list of eight possible pricing selections.
- Tip: Even if the item does not offer quantity break pricing, select quantity as the pricing option.
Personalization
Personalization is defined as an individual name being imprinted on each item
I = Personalization is done at the vendor’s location (drop shipped items only). The personalization note entered during fulfillment order entry will appear on the drop ship purchase order to the vendor.
H = Personalization is done “In House”. The personalization note entered during fulfillment order entry will create a production order during the print fulfillment order option.
N = No personalization is required for this item.
Customer pricing
Allows the creation of additional pricing structures for this item by program master. It is the same information that is available from the “Cust Price” tab window.
Std # of days until shipped
This field allows you to have different standard shipped days for the items. Order entry will compare the first line items' standard ship date with the order's ship date and give a message if they are different. Fulfillment orders will assign the ship date to the line item based on this item field and will then update the order/ship to's ship date with the earliest ship date for all the lines on the ship to.
Vendors Tab
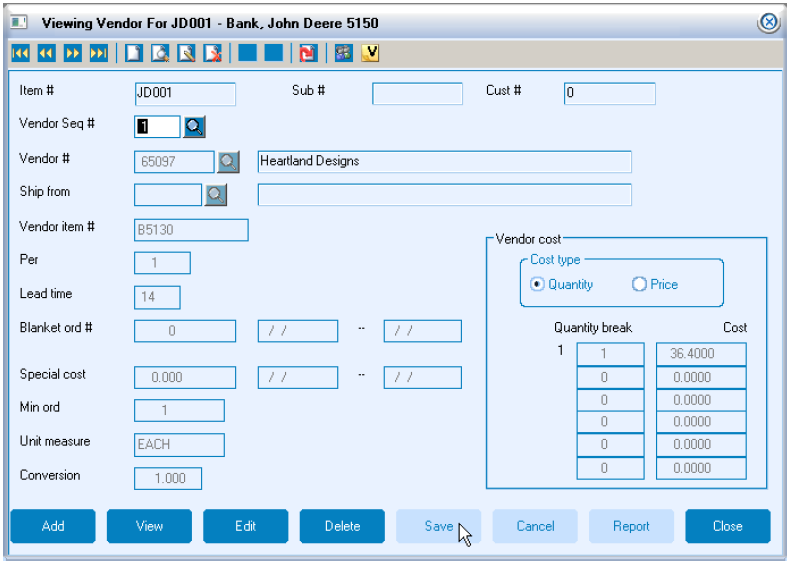
When first displayed, a list view of all vendor records for this item are shown. Once the edit vendor button is selected, the following display window will appear. You may now Add, View, Edit or Delete the vendor records for this item master.
Vendor #
Click add and enter a valid vendor number. The name of the vendor will then appear next to this field.
Ship from
If this vendor has a valid ship from code, you may reference this code. It will be used during purchase order maintenance for determining the default ship from address. If this field is left blank, the ship from address will default based on the vendor master.
Vendor item #
Enter the number that your vendor has assigned this item from their catalog. On the purchase order to the vendor, this number will be used as the purchased item number. Your item number will appear on the original and receiving copy of the purchase order.
Per - vendor
The pricing “per” this vendor uses. This will default into inventory purchase order entry.
Lead time
How many days it takes the vendor to fill the order. This information will print on the Purchase Requirements Checklist and during purchase order maintenance.
Blanket ord #
If you have a special purchase arrangement with your vendor, a blanket order number can be entered for reference only with range of valid dates.
Special cost
A sale cost and a range of dates during which this cost is valid can be entered in this field. During purchase order entry this special cost will be used when the purchase order date is within this range.
Min ord
Vendor minimum purchase quantity to avoid a below minimum charge. A message will appear during purchase order entry if you order less than this quantity.
Unit measure
Enter the vendor purchase unit of measure in this field. The description of the unit of measure needs to be consistent with the per and conversion factor.
Conversion
Used to convert the vendor purchase quantity to your stocking unit quantities at receiving time. The calculation will be based on the purchase quantity multiplied by the conversion factor. For example, you may purchase golf balls by the dozen and wish to stock by in sleeves. Your conversion factor would be 4.
Vendor cost
Vendor pricing structure based on Price or Quantity breaks. Depending on the selection, the price/cost on the purchase order will appear in a window for you to select (Price) or will be updated automatically based on the quantity ordered (Quantity breaks). There is a maximum of six levels of cost.
Activity Tab
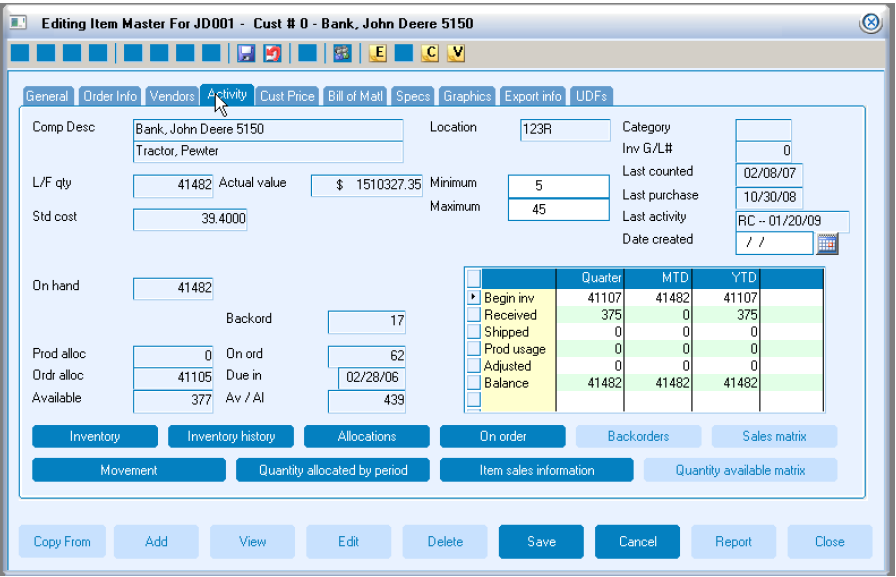
The activity tab will display current on hand, allocations, on order, back orders and movement summary information. Additional drill-down buttons are available to display inventory, inventory history, allocations, on order, movement, quantity allocated by period and item sales information. The item type will control the enabling and disabling of the action buttons.
With the exception of the minimum and maximum fields information is for display purposes only and editing is not allowed.
L/F qty
Displays the total LIFO/FIFO record quantity on hand. By pressing the Inventory button you will be able to drill-down to each record and show information related to receipt transactions including the PO #, Qty remaining on hand, and costing.
Actual value
This is the total on hand quantityvalue based on the individual LIFO/FIFO costs.
Std cost
Displayed for reference.
On hand
Current on hand balance.
Stk ord
This is the total quantity of this item used in an “OP” item type bill of materials for purchase orders in process.
Cust ord
This is the total quantity of items that are allocated in orders that have yet to be billed. Items that have been back ordered will be included in this total.
Available
The available quantity of an item is calculated by taking the current on hand quantity; less customer order allocations.
Backorder
Displays the total quantity of this item that is back ordered.
On ord
Total quantity of the item on order with your vendor.
Due in
Updated based on the date needed from the open purchase orders. This is based on the first purchase order found chronologically if multiple purchase orders exist.
Av/al
Calculated by taking the available quantity and adding the on order quantity.
Minimum
Minimum quantity to be maintained in inventory. There are two below minimum reports that can be generated for items that have available quantity less than the minimum quantity.
- Tip: Below Minimum and Purchase Requirements Reporting will list items that need to be restocked.
Maximum
Maximum quantity to be maintained in inventory. It will appear on the below minimum reports, to gauge purchasing requirements.
Category
Is being re-displayed based on entry from the order info tab.
Inv GL #
Is being re-displayed based on entry from the order info tab.
Last counted
Updated during physical inventory count posting.
Last purch
Updated during purchase order entry.
Last activity
Will display a date and source of the activity.
Customer Pricing Tab (Cust Price)
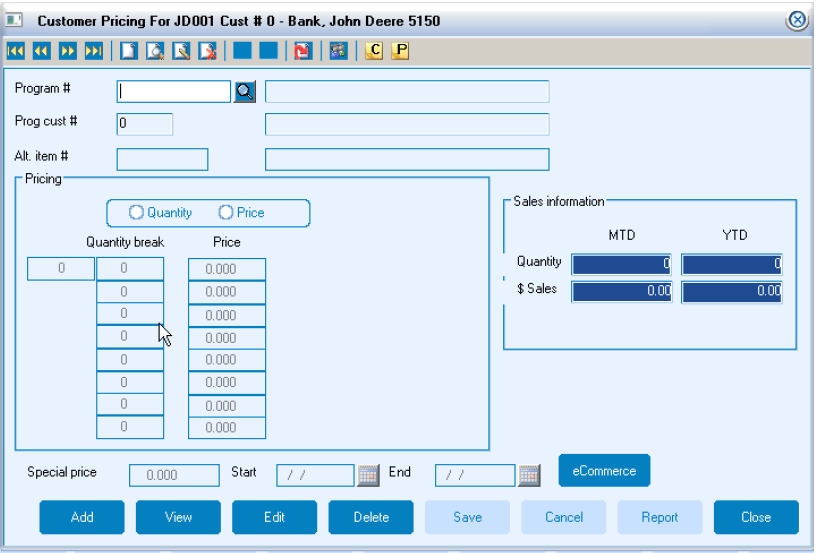
The customer pricing tab allows multiple pricing structures to be set up for an item master record. If you have a situation where you charge prices dependent on whom is purchasing the item, you can create price records based on program. By creating program masters for each situation you may then create the price record by program and during order entry the program number entered on the order will control what price defaults into the order.
Program #
Program number for this price record.
Prog cust #
Default from the program master.
Alt item #
A different item number can be created for this price record. Referred to as an alternate item number.
Pricing
Select Quantity or Price as your option and enter the pricing information.
Special price
A special price and range of dates can be entered on this screen. During order entry, if the order is entered within this range of dates, this pricing will become the default price on the order.
Sales information
MTD and YTD values are displayed and can be included on the “Costing/Sales Report”.
Bill of Material (Bill of Matl) Tab
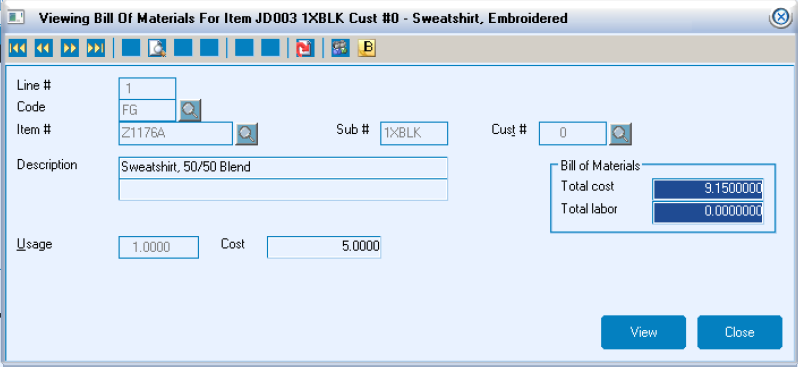
The bill of material window is only available when the item type is an OP (Outside Processed). For additional details please review the procedures for creating an OP item master record.
Specs Tab - Item Master
The Specs tab on the item master is used to add detailed specifications for the item and prints on a separate page connected to an order or inventory purchase order. Specs may be keyed in or copied from a line item specification template or from another item master. Click on the Copy specs button to copy specs from a template or item master.
Copy Specs - Item Master
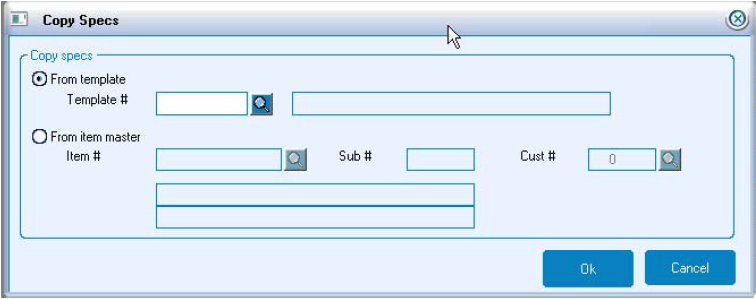
Specifications for an item master may be added or edited by defaulting from a template or by copying in from another item master. When the item master is added as a line item to an order or inventory purchase order, the specifications (specs) are pulled in.
Graphics Tab - Item Master
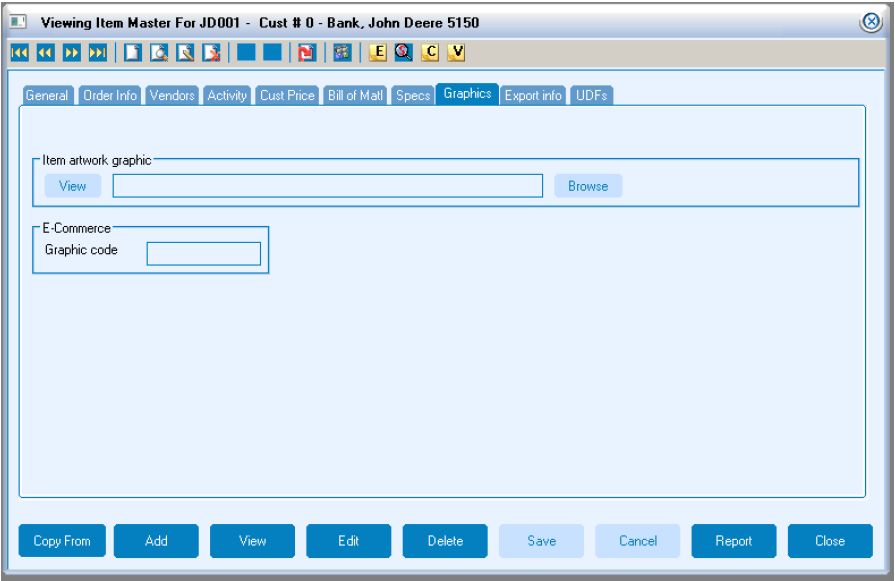
Enter the drive/path/filename or click the Browse button to select the location of the graphics file associated with this item master. Click on the View button to display the image on the screen to review.
Plus Tab
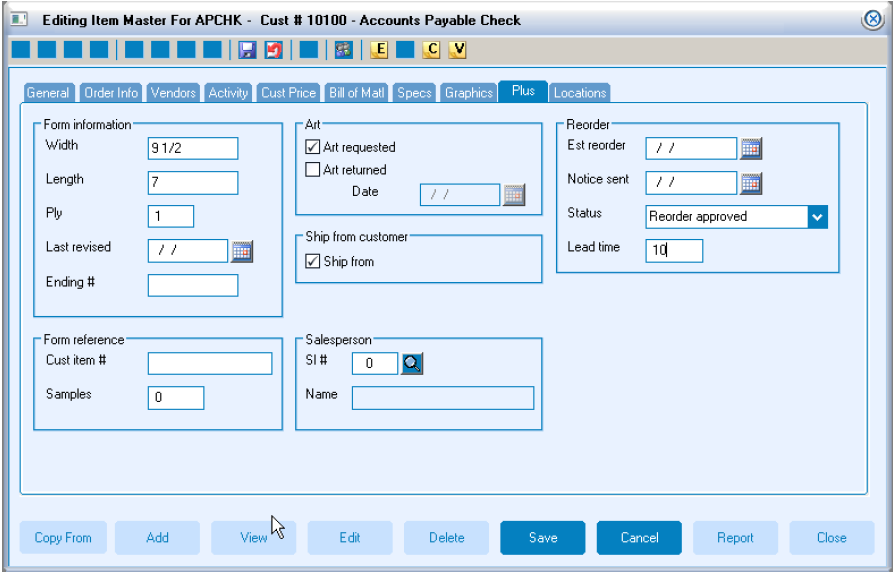
The Plus Tab will store additional spec information for order entry and forms management.
Width and length
These fields are used for reorder/grouping reports that sort by item size to combine orders for better pricing. Be consistant when entering width’s and length’s to your item masters or the system will recognize the numbers as two different sizes.
Ply
The number of ply for this item.
Last revised
This will orginally be the date item was first ordered. This date is then changed whenever the item is revised. This date can be selected to print on the Item Catalog.
Ending #
The ending sequence number for the last order produced. This will be updated from the shipped qty on the line item during billing, bill only, and fulfillment bill/ship. It will also be updated when closing an order during inventory receiving. When the next order is entered, one (1) will be added to this number to become the starting # for the new order of this item.
Cust Item #
A reference only field to enter your customer’ item number when different from your item #. If you would like this to pull for reporting and lookups you should use the customer pricing on the item master with a unique program #.
Samples
A reference only field to record the number of samples of this form.
Art requested
Updated from the “Return Art” field on the specification “other” screen in order entry line items. If checked, indicates artwork needs to be returned by the vendor.
Art returned date
Updated when the vendor acknowledgement is entered or indicated on the freight screen of billing. The date defaults as the machine date.
Ship from customer
If checked, allows this item to be shipped between customers.
Salesperson
Assign a salesperson if a specific salesperson sells this item. An Item Catalog may then be generated for one salesperson's items.
Estimated reorder date
Calculated during order entry by determining the average number of days between orders and the average quanity ordered minus the lead time. Until there is order history for this item the estimated reorder date defaults from company information, the “Default # of days until reorder date” field.
Notice sent
Most recent date a reorder notice was printed for your customer. Updated by Print Reorder Notices.
Status
Tracks the reorder status of the item. Default for new items is “No Status”. Only “Reordered” and “Reorder notice sent” are updated by the program. All others must be updated manually. Following, are valid status codes.
- Form inactive – this form is not being used but do not want to destroy yet.
- Form to be destroyed – this form is no longer used and may be destroyed.
- Never send reorder notice – do NOT send a reorder notice to this customer.
- Reorder approved – customer has approved the reorder notice.
- Reorder notice sent – a reorder notice was sent to your customer on the date appearing in the Notice sent field. Prevents another notice printing unless you indicate to print reorder notices for forms with status S. Updated by print reorder notices.
- Reorder on hold – Customer has put a stop on reordering.
- Reordered – form has been reordered. Updated by order entry.
Lead time
The usual number of days required to produce this item. Lead time is an option to print on reorder reports. Used in the calculation of estimated reorder date.
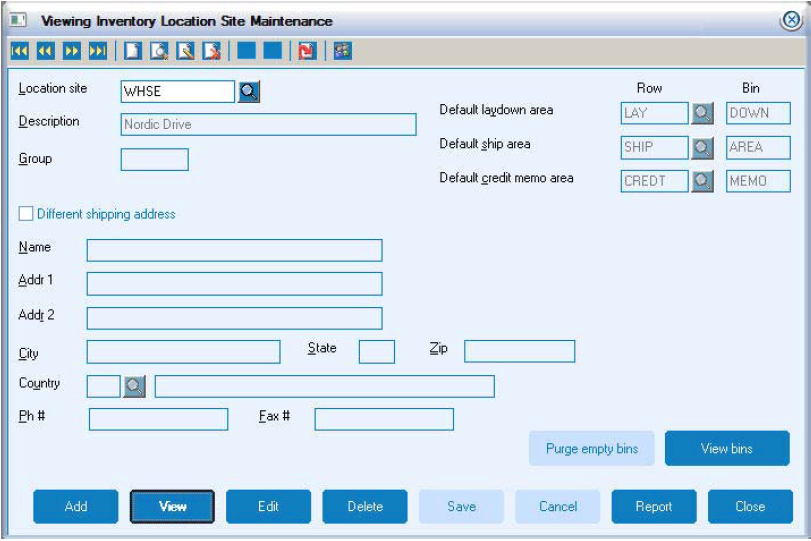
Location Tab
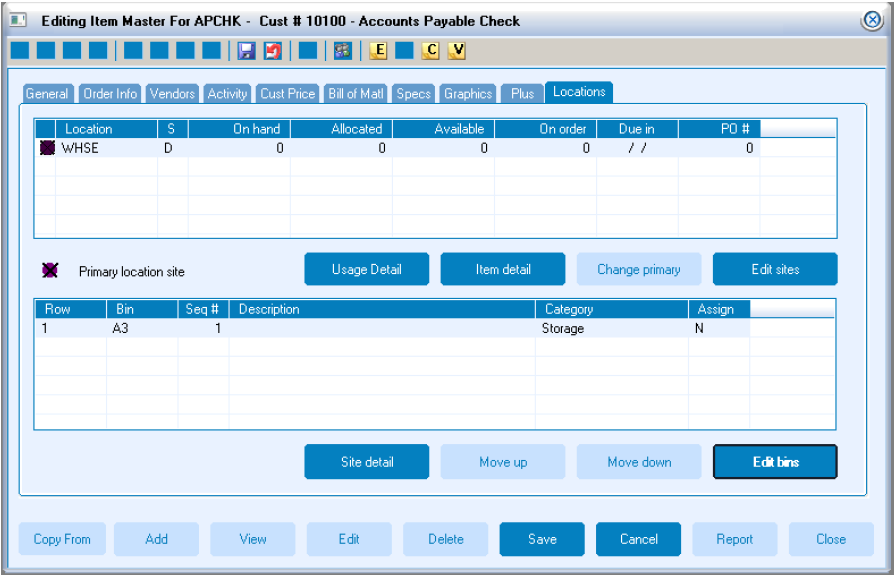
The locations tab on the item master provides specific warehouse location information for an item including the row/bin where the item is stored.
Edit site
Displays’ on hand, allocated and back ordered amounts, as well as the on order quantity, date the order is due in and the PO # for this location. Additional drill-down buttons are available to display inventory history, allocations, and on order. Movement summary is displayed for this location.
Minimum
Enter the quantity at which point the item needs to be reordered. Used to determine when to reorder on forms management reports and reorder notices.
Stored at
Defines whether this site is a client location or your warehouse location. Once inventory has been received into a location this option is no longer available for editing.
· Client storage is inventory management at off-site locations that may be client, factory or other non-distributor locations. Select “client” if merchandise is ordered from a supplier and shipping directly to a client location where inventory will be managed or to transfer stock from your warehouse location to a client location. Usage for the client location is updated by method of count in all instances.
· Distributor storage is the more common inventory management process. Merchandise is received into your warehouse location and stored. Releases are then used to ship and bill the customer for the inventory and record usage at the time of the shipment.
Usage by count
Check this field if item is counted each week, month, etc. A count is entered to determine the actual usage of the form. Usage is then calculated by the difference between current on hand and the form count. If the stored at is “client” the usage by count is checked and cannot be unchecked. If unchecked, the usage is based on shipments to the customer and when the Monthly Usage Update option is run.
Transferable
If unchecked this item may not be used by another location (ex: branch office).
Distribution center
A location is a distribution center when it is a storage site and another location (usually the customer’s site) is used for updating of the usage. If checked, usage for this location is suppressed from printing on forms management reports. The on-hand inventory is included in the calculation of value and reorder point.
Matrix Design Procedure Overview
![]()
A matrix consists of two key data elements. For the purpose of this document we will use “size” and “color”. With the release of Version 7.80C, the ability to map and control the appearance of an item matrix window has been implemented. This new matrix window can then be used to enter, edit and bill orders and enter, edit and receive purchase orders. During the installation of 7.80C your current wearable items will be converted to the standard matrix of size and color codes that have been available in the prior versions. A Matrix Id master record will be created and assigned to the current item masters automatically. At this same time “Color Code” and “Size Code” masters will be created. You may at any time modify those colors and size codes to better identify the data they represent.
A sample window display shows the results of editing the Color and Size Codes. For example instead of just SM, MD, LG, 1X, 2X, 3X and 4X, the window can be designed to show the longer form of the size description. Same thing is true for the colors.
The concept of the matrix window is not just limited to wearable items such as t-shirts. With this new design you can create custom matrix windows for any type of common items where the primary difference is size and colors. Items such as dress shirts, slacks, shoes, women sizing, youths and even flashlights can be created with matrix functionality. There are some base rules that apply to this new feature. For example all matrix items require a base item master and a creation of sub items, which will contain the specific size and color identification. The base and sub items must have common settings such as they must be of the same item type and method of inventory, the sequence of the purchasing vendors must be the same, and “OP” items must be set up in the same sequence of items and item types. When one or more variations occur during matrix entry of the item, a validation message will appear denoting the situation and in some cases will not allow the operator to enter that item within that particular matrix group. In those situations the item may be entered as a separate line or can be placed in a separate matrix entry group on another line.
Getting Started
As stated, during the installation of version 7.80C, the current items marked wearable will be converted using the item’s sub number to create the “Size and Color codes” based on the first two characters for the size followed by the three characters for the color. Each item and the related subs will be analyzed to determine the combination of size and colors. This information is used to create a unique Matrix Id, which will be assigned to that item and it’s subs.
All of the maintenance programs related to the Matrix are located in Inventory, templates.
Design Code Maintenance
To be implemented in a future version.
Color Category Maintenance
Used to assign color categories and a long description of the category. Additional enhancements will be implemented in a future version.
Color Code Maintenance
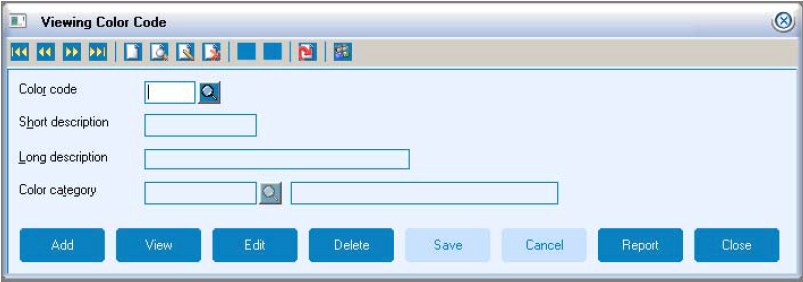
Used to define the three character color code used in the item sub # of the item master number. A short description of up to 10 characters is allowed with a long description of 25 characters if needed. The short description is used for the matrix display window and matrix printing.
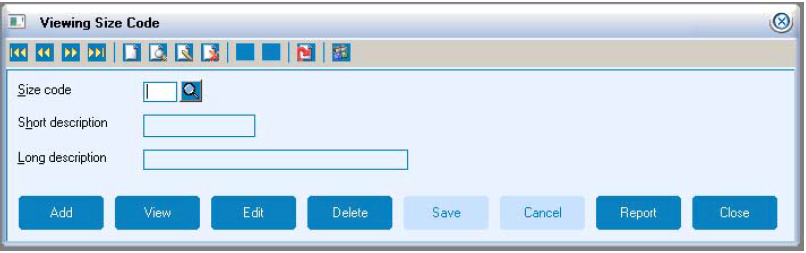
Size Code Maintenance
Matrix Id Maintenance
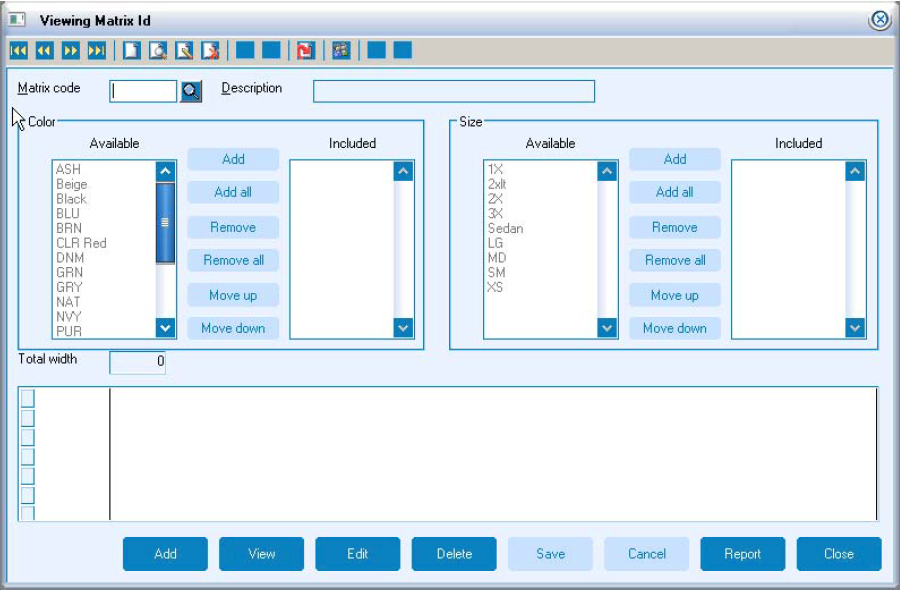
Used to bring both data elements (size and color) together and create the user defined matrix window.
Matrix Id is the primary identifier of the master record. A lookup by either the matrix’s ID or the long description is available.
Color and size groups provide a complete listing of all possible Color and Size Codes that have been previously defined. The operator then selects and moves the specific color and size codes to be used for this matrix id over to the right hand portion of each group. This begins the mapping process with the results displayed as they are made in real time. You may move your specific selection up and down in the lists to control the sequence of how they are displayed on the window. Once you have created your matrix id you can assign that code to the item master(s) by editing or creating new item master records.
Program Change/Modifications
Every application that involves item masters has been changed in relation to the matrix feature. This includes Item Master, Inventory Reporting, Purchase Orders, Order/Billing and Vouching functions.
Item Master maintenance has been changed. You now assign a matrix id on the base item. All subsequent sub items will be assigned the same matrix id, there is no exception to this rule. The matrix cd field replaces the Matrix checkbox on the item master general tab window. The item master activity tab window will display the Sales matrix and Quantity available matrix based on matrix id design.
Inventory Reports that have been affected include Open Purchase Orders, Inventory Backorder and Unshipped Items. Each of these reports has an additional checkbox to include matrix level detail. Selecting this option will print the actual sub items that were entered using matrix and their respective quantities. Not selecting this option will only print the related base item with a combined quantity for items entered through the matrix.
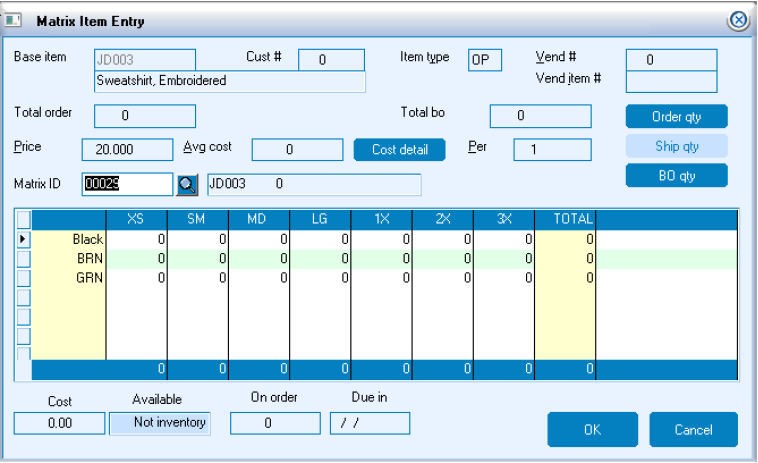
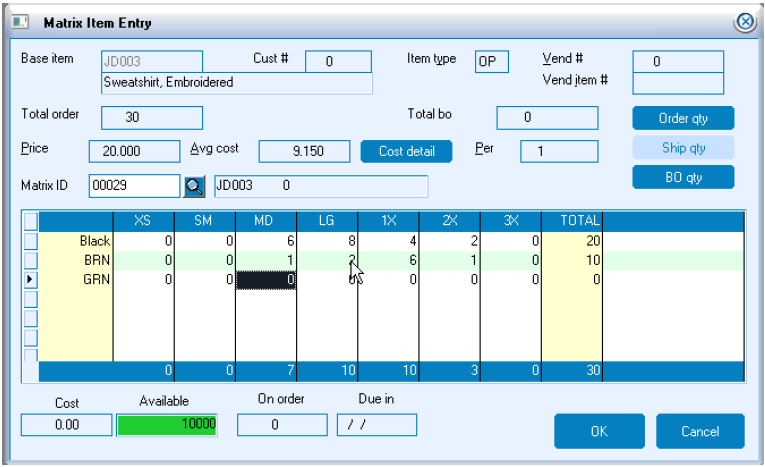
Purchase Orders contain changes to allow entry of inventory items through the new matrix display window. To use the matrix entry method you begin by entering the item master’s base item number on the purchase order line edit window. Select Continue and then select the Matrix button.
When selecting the Matrix button, a new window will display based on the user defined parameters. The operator may begin entry of the quantities to be purchased. Some of the key elements of this window include avg cost, cost detail, matrix id and the cells where quantities are entered.
The avg. cost, referred to as Matrix Average Costing or MAC, performs a calculation based on the quantities being ordered and their relevant vendor cost and divides the resulting value by the total quantity ordered. The cost detail button allows access to view/edit the specific values, which in turn will recalculate the resulting value by the total quantity ordered.
Note: The printed purchase order will separate the matrix by cost value if there are different costs for different sizes.
Matrix id will default from the base item setup, but can be edited if needed. Entry of the quantities will validate to make sure that the sub item does match the setup of the base item. If not, various validation messages may appear describing the reason why this specific item cannot be added through the matrix. An example includes a check to make sure that the item type of the sub item being ordered matches the base item. If not, then the item has to be entered as a separate non-matrix item or the item master can be modified to match the base.
As the quantities are entered you will notice that various fields are being updated which in turn will update the line item edit window. An example is the avg cost as this field is updated with the MAC of the matrix item, the resulting value will update the line item edit window cost field. This is used to determine the MAC of the item and will not affect the way the item will print on the purchase order to the vendor.
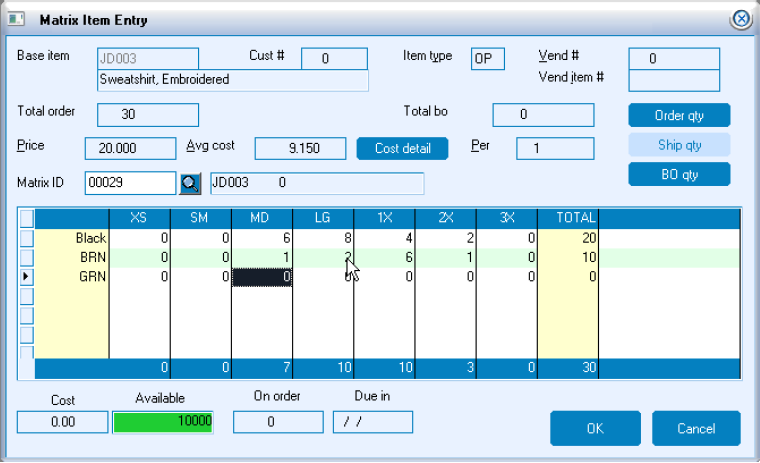
You will notice that using the matrix method of entry will only create one line item. Any editing is then performed against that one line item record which will allow access to the matrix display window.
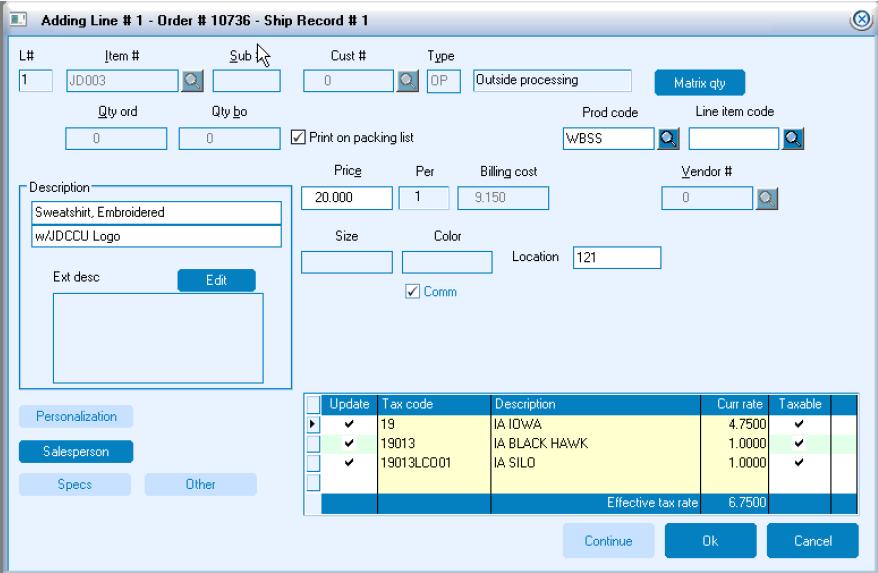
Outside Processed “OP” items work in a similar way for the main line item edit window. You will notice a separate Matrix Qty button on the OP line item edit window.
Note: Blank goods used in an OP item must contain the same Size/Color Codes as the base OP item. The Matrix Id that is assigned to the “OP” base item will be assigned to the blank good base item on the OP line item edit window.
Order/Billing and Fulfillment has been changed to allow entry of line item information through the matrix display window. The same type of window is displayed for all order entry methods (Regular and Fulfillment).
To use this option enter the item master’s base item number. Press Continue and then select Matrix Qty button. Some of the key elements of this window include Price, avg cost, cost detail, matrix id and the cells where quantities are entered.
Price will display from the base item price. If a sub item’s price is different a validation window will be displayed, allowing the operator to select to use the current base price, change all pricing to the specific subs price or clear the qty and continue (which indicates that the operator will enter this matrix item as another line in order to retain the specific price).
The avg cost, referred to as Matrix Average Costing or MAC, performs a calculation based on the quantities being ordered and their relevant cost and divides the resulting value by the total quantity ordered. The cost detail button allows access to view the specific values.
Matrix id will default from the base item setup but can be edited if needed.
Entry of the quantities will validate to make sure that the sub item does match the setup of the base item. If not, various validation messages may appear describing the reason why this specific item cannot be added through the matrix. An example includes a check to make sure that the item type of the sub item being ordered matches the base item. If not, then the item has to be entered as a separate non-matrix item or the item master can be modified to match the base.
As the quantities are entered you will notice that various fields are being updated which in turn will update the line item edit window. An example is the avg cost as this field is updated with the MAC of the matrix item; the resulting value will update the line item edit window cost field. This will not affect the way that the various order forms are printed. If there are different costs on the matrix sub items then a separate print matrix group is created (except for the customer acknowledgement plain paper copy).
You will notice that using the matrix method of entry will only create one line item. Any editing is then performed against that one line item record which will allow access to the matrix display window.
During billing processes the matrix window will allow entry of the quantity shipped and back ordered. Double click on each quantity cell to bring up the edit window to enter those values. This only needs to be done if the quantity shipped values are different than ordered. When back orders are created for matrix items the line item will retain the matrix detail related to the back ordered sub item.
Other applications that have been changed in relation to order/billing and fulfillment applications include Transfer to Purchase Orders (FF), Transfer to Billing (FF), Open Order Reports and Order History Reporting.
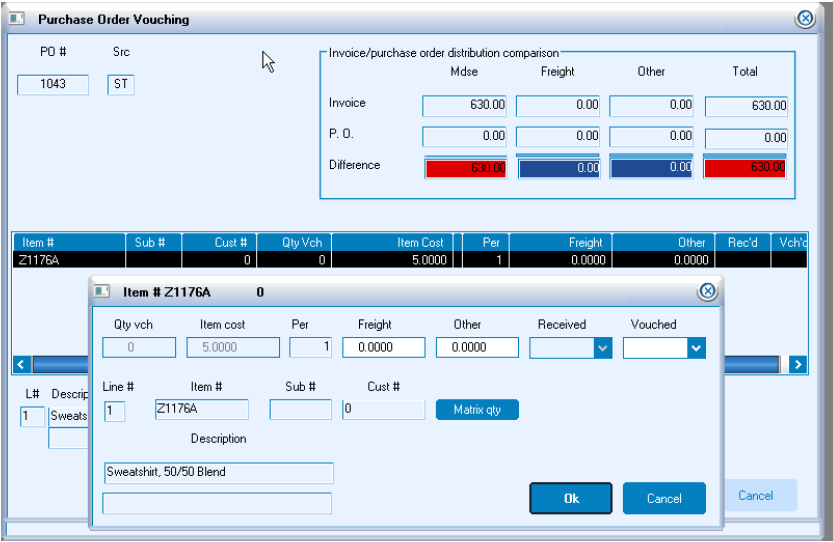
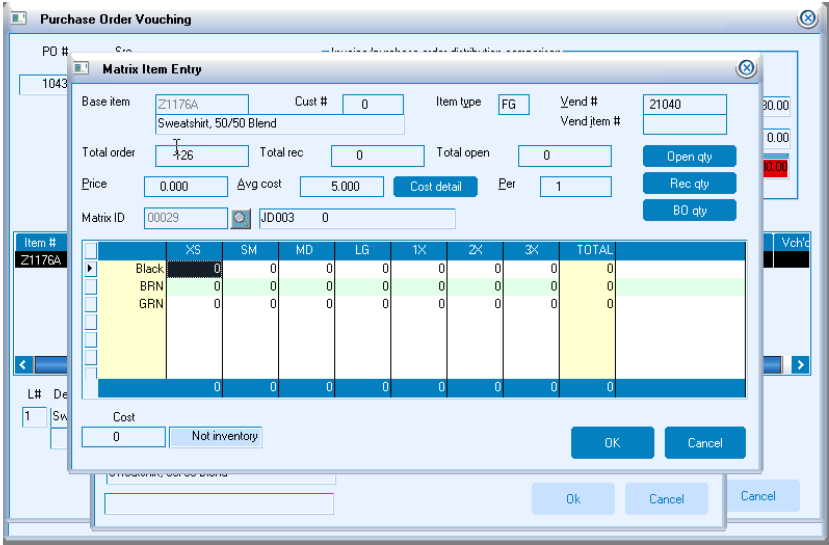
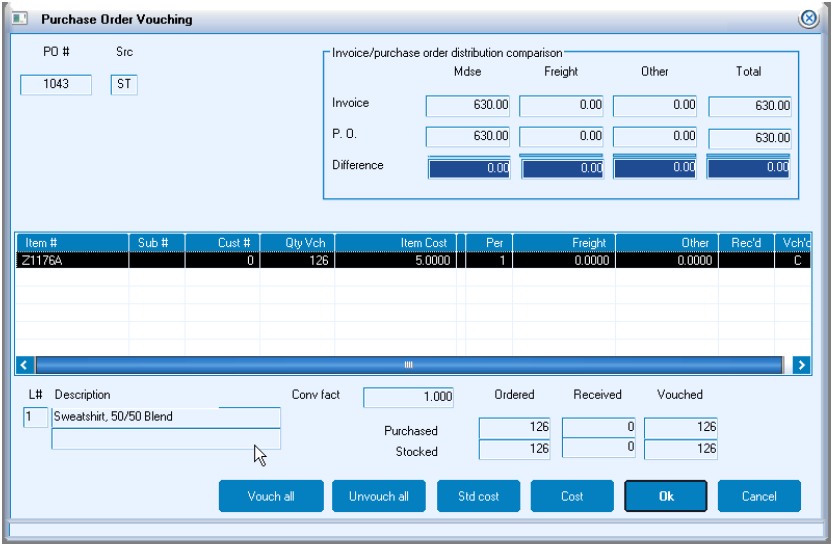
Vouching distributions to purchase orders contain changes related to purchase orders entered using the matrix window. When accessing the Item distribution window there will only be one line per matrix item displayed. Double click on the record and the displayed edit window will show a Matrix Qty. button. Accessing this button will allow the operator to distribute the vouch quantity and edit the cost (Cost Detail button) if needed. Upon completion of the quantity/cost distribution the operator can return to the Item distribution window and complete distributions related to freight and other costs.
Matrix Average Costing (MAC)
One of the most challenging areas of the matrix design involved the tracking of costs per matrix items. Because the main factor of the new design was to allow entry of the item by matrix and editing of the item by matrix; ASICS developed matrix average costing or MAC. Each matrix item stores its own costing value, with the software performing a calculation to determine MAC and updating this calculation to the line item record. This calculation is performed every time a matrix item is entered or edited. Each individual matrix item quantity is multiplied by the unit cost divided by per and is accumulated for each item in the matrix. That total value is then divided by the accumulated quantity to arrive at the MAC. The MAC value is then written to the line item related record cost field.
In some cases such as commission and various other reporting options the MAC cost is used for determining the extended value. In other cases such as receiving and general ledger processing the matrix unit cost is used to determine the value to be assigned.
An example of the calculation follows.
Matrix window consist of 3 size/color elements.
Quantity Cost Per Extended Value
Element 1 1000 4.75 1 4750.00
Element 2 750 4.85 1 3637.50
Element 3 288 5.00 1 1440.00
2038 4.822 (MAC) 9827.50
The MAC cost would be 9827.50 / 2038 = 4.82212 rounded to 4.822 per unit.
In this example the actual extended cost of the MAC value would be 9827.24 vs. identical entry of individual lines of 9827.50. Because of rounding there is a difference of .26 on the total order value. This will only occur in relation to the cost and will not affect pricing to a customer. This is somewhat of an extreme example but shows that there can be minor costing differences related to the MAC calculation vs. the entry of the same item as separate lines.