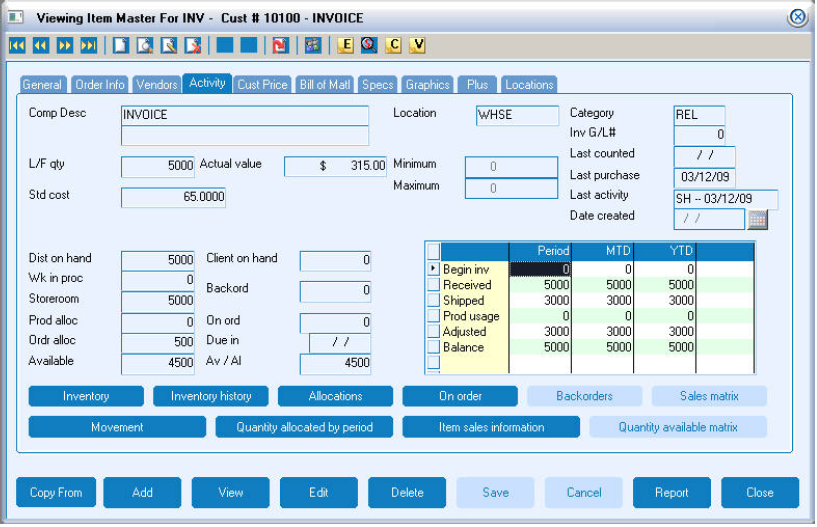
Picklist Processing
Pick list processing consists of two options for processing inventory. “Review/Release/Print Picklist” will evaluate inventory needs based on open order requirements; which has not been assigned a pick ticket number. “Pick Reporting” is the option to record the moving of inventory from a storage row/bin to the consumption center. During billing the inventory is then (consumed) reported as being removed from inventory. “Pick Reporting” is recommended if your company information indicates that you are reporting inventory picks “Explicit” verses “Implicit”. (See Company Information for additional details).
Review/Release/Print Picklist
The main option window allows the ability to limit or expand the scope of your processing inquiry. Options include a number of selections, which can be used to limit the records you wish to process. Additionally you may wish to clear items marked for hold during previous processes, include (expected) on order quantity in calculations or include all sites in the calculations.
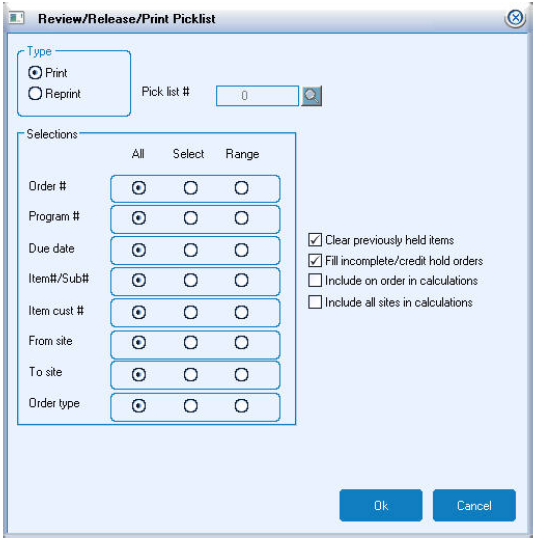
Once the selection are complete press “Ok” to continue the process. At this point the inventory detail records are evaluated based on each item’s unique setup characteristics.
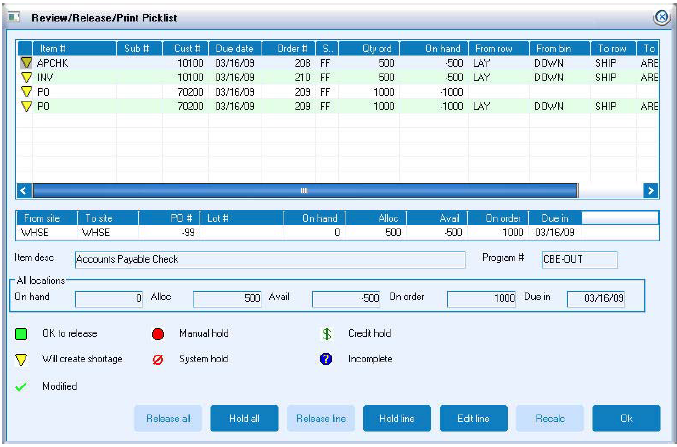
Several factors are used to determine which location, row and bin will be selected. The first check is to see if the order entry operator entered a specific location, row and bin record during order entry processing. The sequence number, that has been assigned, is based on item maintenance and is reviewed and compared to the inventory needs as displayed in the list view. In some cases due to shortages the row and bin selected may default (based on company information) to either the default laydown or the first sequence bin record in item maintenance.
Records that display a “green” icon have determined that inventory levels are sufficient and no additional warnings are required. You may optionally edit a record and manually change the “From location”, “Row”, “Bin”, “To location”, “Row” or “Bin” if needed. Changes made will be reflected against the order once the pick list process is complete and pick ticket has been printed.
Information will include the item, sub, customer #, due date (expected ship date), order #, source of order (FF = Fulfillment, OE = Order Entry or OP = inventory purchase order), qty ordered and remaining balance for this specific site detail record. This is followed by the manually entered or recommended selections as to what row and bin the inventory should be picked from and in most cases will route the inventory to the default shipping row/bin record that was entered on the location master record.
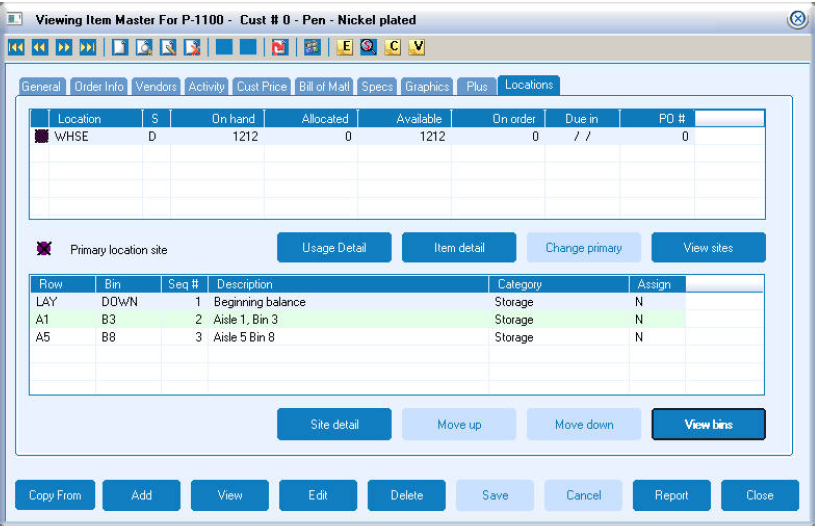
To explain the selection process the following item master location display will show the first item in the listview. This item has been assigned three possible storage locations. They are sequenced from 1 –3.
The results of editing or placing records on hold, in “Review and Release”, will be shown with different icons. In some cases, such as hold, you will be required to recalculate which will re-evaluate the new inventory requirements and start re-applying inventory based on these changes.
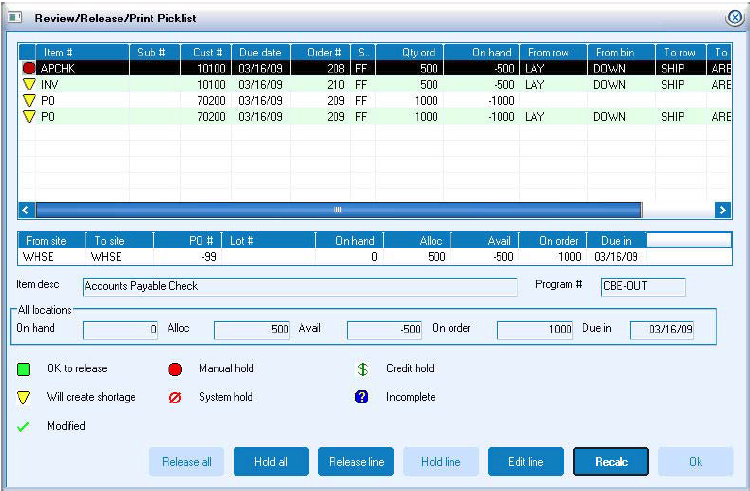
Possible reasons for placing record(s) on hold would include orders that may wish to process later or by placing one order on hold may remove shortage icons on other more critical orders and allow the inventory to be assigned to those orders first.
Recalc will only be active if required. Once recalc has been selected you may continue with other editing or select “Ok” to continue the process and print the pick ticket.
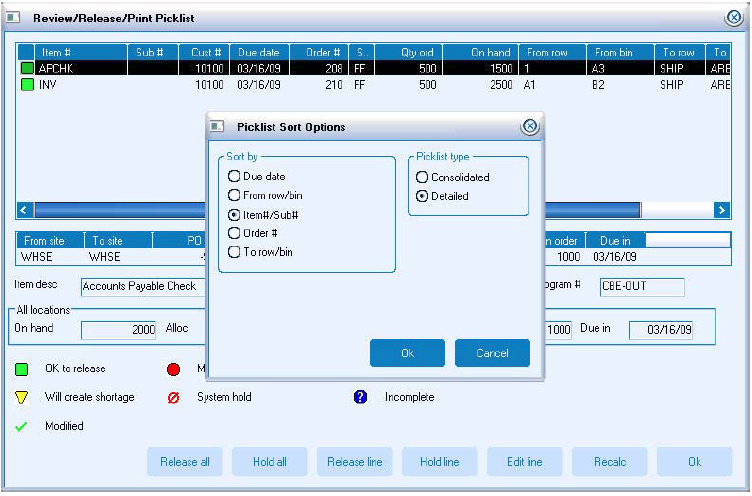
Once you have selected “Ok” a print option window will be displayed that allows the operator to select the sort by selection. To expedite picking you may want to sort by “Form row/bin”. If multiple locations are to be affected a separate pick ticket will be created with the respective row/bins to be affected.
A preview of the report will display and can be printed with the print toolbar option. Each item will be listed and will include warehouse information including the row and bin to pick the inventory from and where to route the inventory (in our example the “SHIP AREA” per our location master default). An expected shortage flag will print as notification that there is insufficient inventory available to complete the pick. A manual input area is available for the employee to record results of picking or as signal that the specified row/bin is empty. The “Pack” and “Cartons” columns will only print for “ProfitMaker/Forms” package.
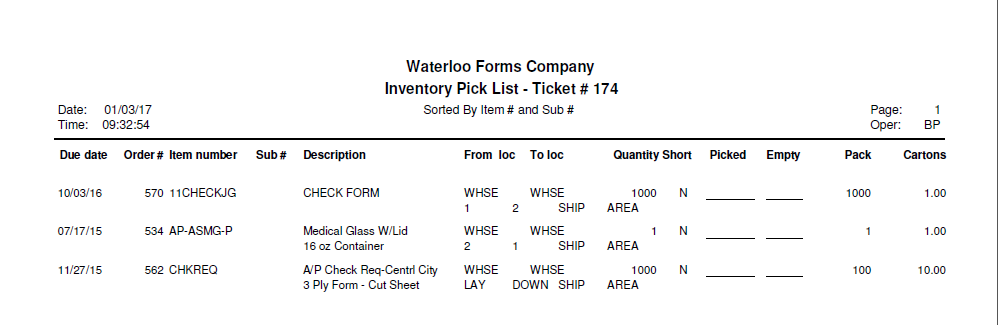
The use of the “empty flag” can be used to locate discrepancy between the warehouse and the inventory as indicated on the computer. The report “Location Bins Discrepancy” report shows records the computer indicates inventory exists, but the row/bin has received an “empty flag” as part of general processes. Additionally, it will show records the computer indicates no inventory, but the row/bin has NOT received an “empty flag” setting.
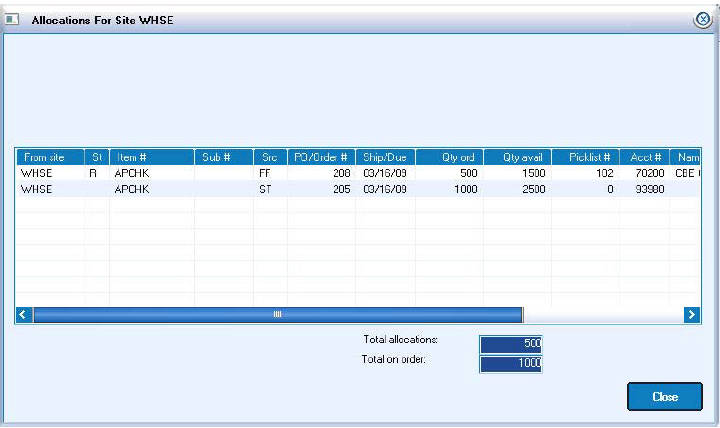
The effect of printing the pick ticket will affect several displays and reports in the system. The item master will show this effect when reviewing allocations and location details. The location display (Activity tab, allocation button) will include a release status and the pick number created. In the example we can see that two records have been “Released” as indicated by the status of “R” and the records were created against pick ticket. The first record is the result of placing a “Hold” on the record; which show a status of “S” which means the process was suspended.
From the location tab window we can now display the item/site detail records; which now indicate that the inventory has been reserved against a specific detail record. If this record would go through the process again only the balance of the on hand less reserve will be used to determine if there is enough inventory to be released for new orders that were entered for this item.
The location master window also contains an allocation and item/site detail record display option. In reviewing order #324 the effect of assigning and printing the pick ticket can be seen when editing the line item and select the “Edit locations” button and edit a record to see complete details.
When the pick ticket was created the line item detail records are updated to indicate what inventory detail record is being affected and a item history record “PK” is created that shows that the pick list was created. As the process continues, changes or recording of the pick qty. will update records in real-time.
The “Inventory Allocations Report” will also print or display information related to the creation of the pick ticket.
Pick Reporting
The option window for pick reporting allows the operator to select the pick ticket number that will be processed. The main function of pick reporting is to move the inventory from storage to a consumption center (work in process- WIP). This is done by updating inventory based on what the warehouse has reported as being picked and where the routing of inventory was performed. This is also referred to as “Explicit” reporting. The alternative is referred to as “Implicit” reporting and the updating is performed as part of billing the order. For “Explicit” reporting this becomes a confirmation step and modifications need to be reported for exceptions only.
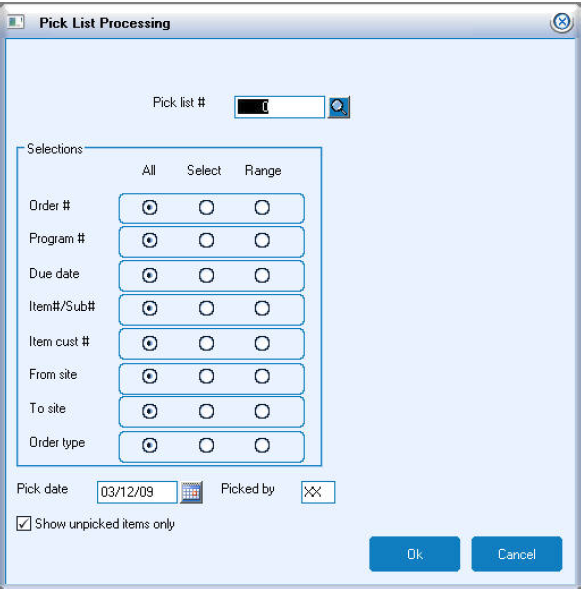
You may select to limit the scope of record to be updated. Once selections are complete. Select “Ok” to continue.
The display of records will appear in the same manner as “Review/Release/Print Picklist” processing. Records that may be short are flagged with a warning icon. The printed pick ticket will be used to see if any additional modifications are needed. In our example the warning icon does indeed confirm that inventory does not exist in sufficient quantities to allow pick reporting. These records will be unselected for updating which will change their icons from yellow to red. This does NOT remove the allocations, just indicates that the reservation of inventory will remain against the laydown row/bin. If the result of the pick leaves the row/bin record empty update the flag appropriately.

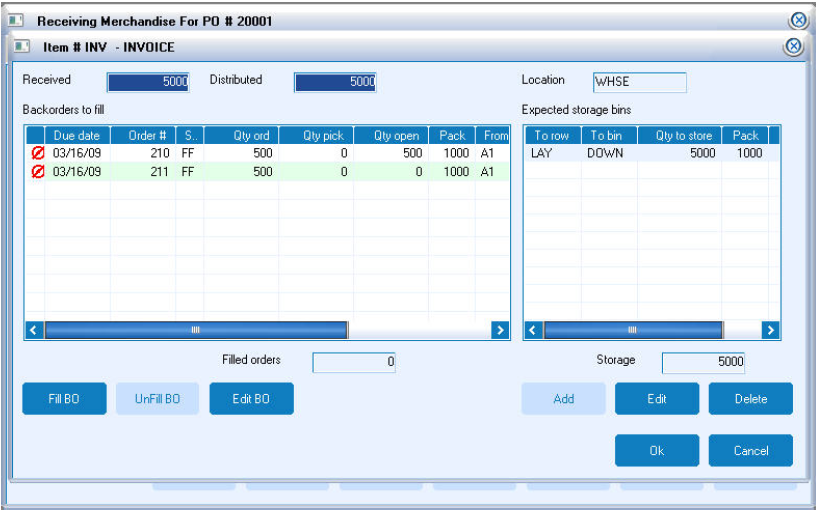
By leaving the reserve quantity against laydown you may at receiving inventory apply incoming receipts for items that are short and have been reserved against laydown to these records and record the pick. The balance is then stored into a storage row/bin. A sample of the receiving window is shown applying a receipt to an order and storing the balance to the bulk location.
Once all modifications are complete.
Select “Process” to update inventory. The item master will now show the result of “Pick Reporting” by updating work-in-process and reducing the storeroom quantity. This now indicates that the inventory was picked (moved) from storage to a consumption center.

The other affect to the item master is that the location item/site detail records will show the quantities being moved from the storage row/bin to the consumption center.
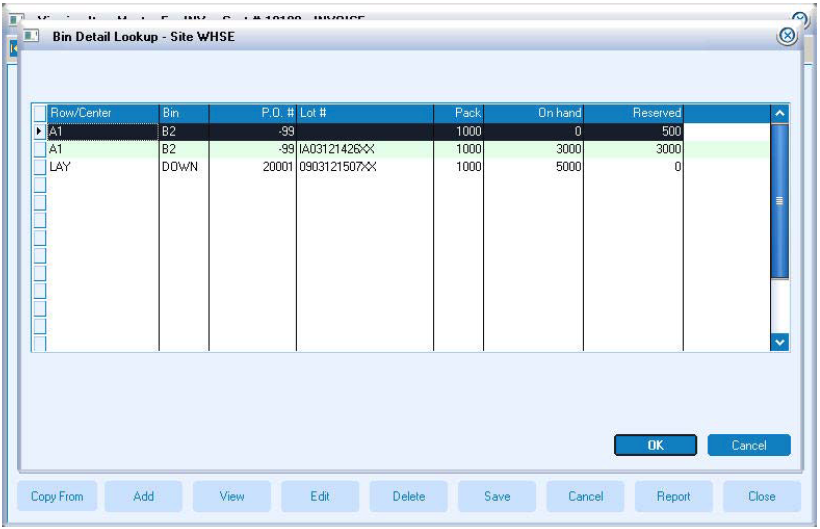
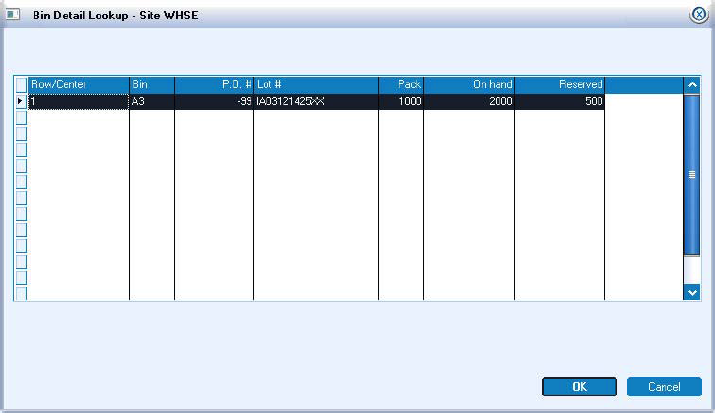
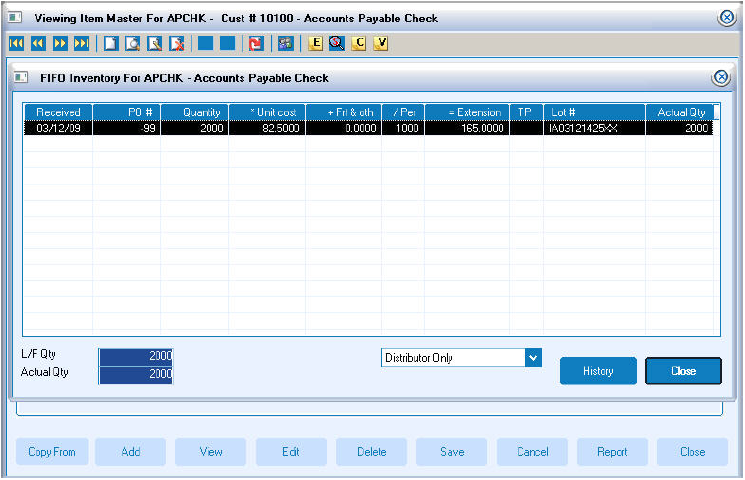
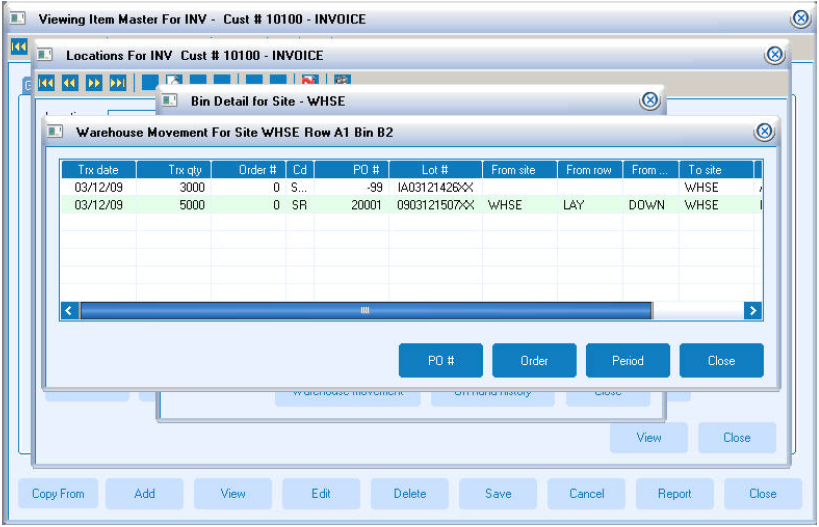
As inventory is moved in and out of various row/bin records; a history record will reference each move. To view these records you may select to “Edit/View site” and then access the “Bin detail” button. This will show currently assigned locations that contain on hand or reserve quantities. Select the record you wish to see more details and then select the “On hand history” button. All records that affected this specific item/site detail record will be displayed. The first two records show the results of “Pick Reporting." Inventory has been moved from the standard storage center “LAY/DOWN” to the consumption center “SHIP / AREA”. Inventory will remain in this consumption center until the order is billed.
Once the order has been billed the same window will show the following records. The item/site detail record displays a reduction of the on hand. A new transaction “IM” will record the shipment of the item and removal from on hand. Other affects include the removal of a quantity on hand, WIP, and available.